
I am currently using Writerside, a new Integrated Development Environment (IDE) designed for technical writers, to create and develop the documentation website for my side project, PingCAP Docsite Preview. Throughout my experience with Writerside, I discovered an undocumented feature: a feedback module. I have utilized Cloudflare Pages Functions and TiDB Cloud Data Service to process the feedback received through this module and store it in the database.
This guide provides step-by-step instructions for integrating a feedback module into your website. It utilizes Writerside, Cloudflare Pages Functions, and TiDB Cloud Data Service for this integration. This will enable you to collect valuable user feedback directly through your website.
View the demo code: writerside-feedback-example
Try the feedback widget: Feedback example page
Prerequisites
- A Writerside project. If you do not have one yet, see Create Writerside project and deploy it to Cloudflare Pages.
- A TiDB Cloud cluster.
- A Cloudflare account.
1. Set up a Writerside project and deploy to Cloudflare Pages
Code example: commit/10a7107
-
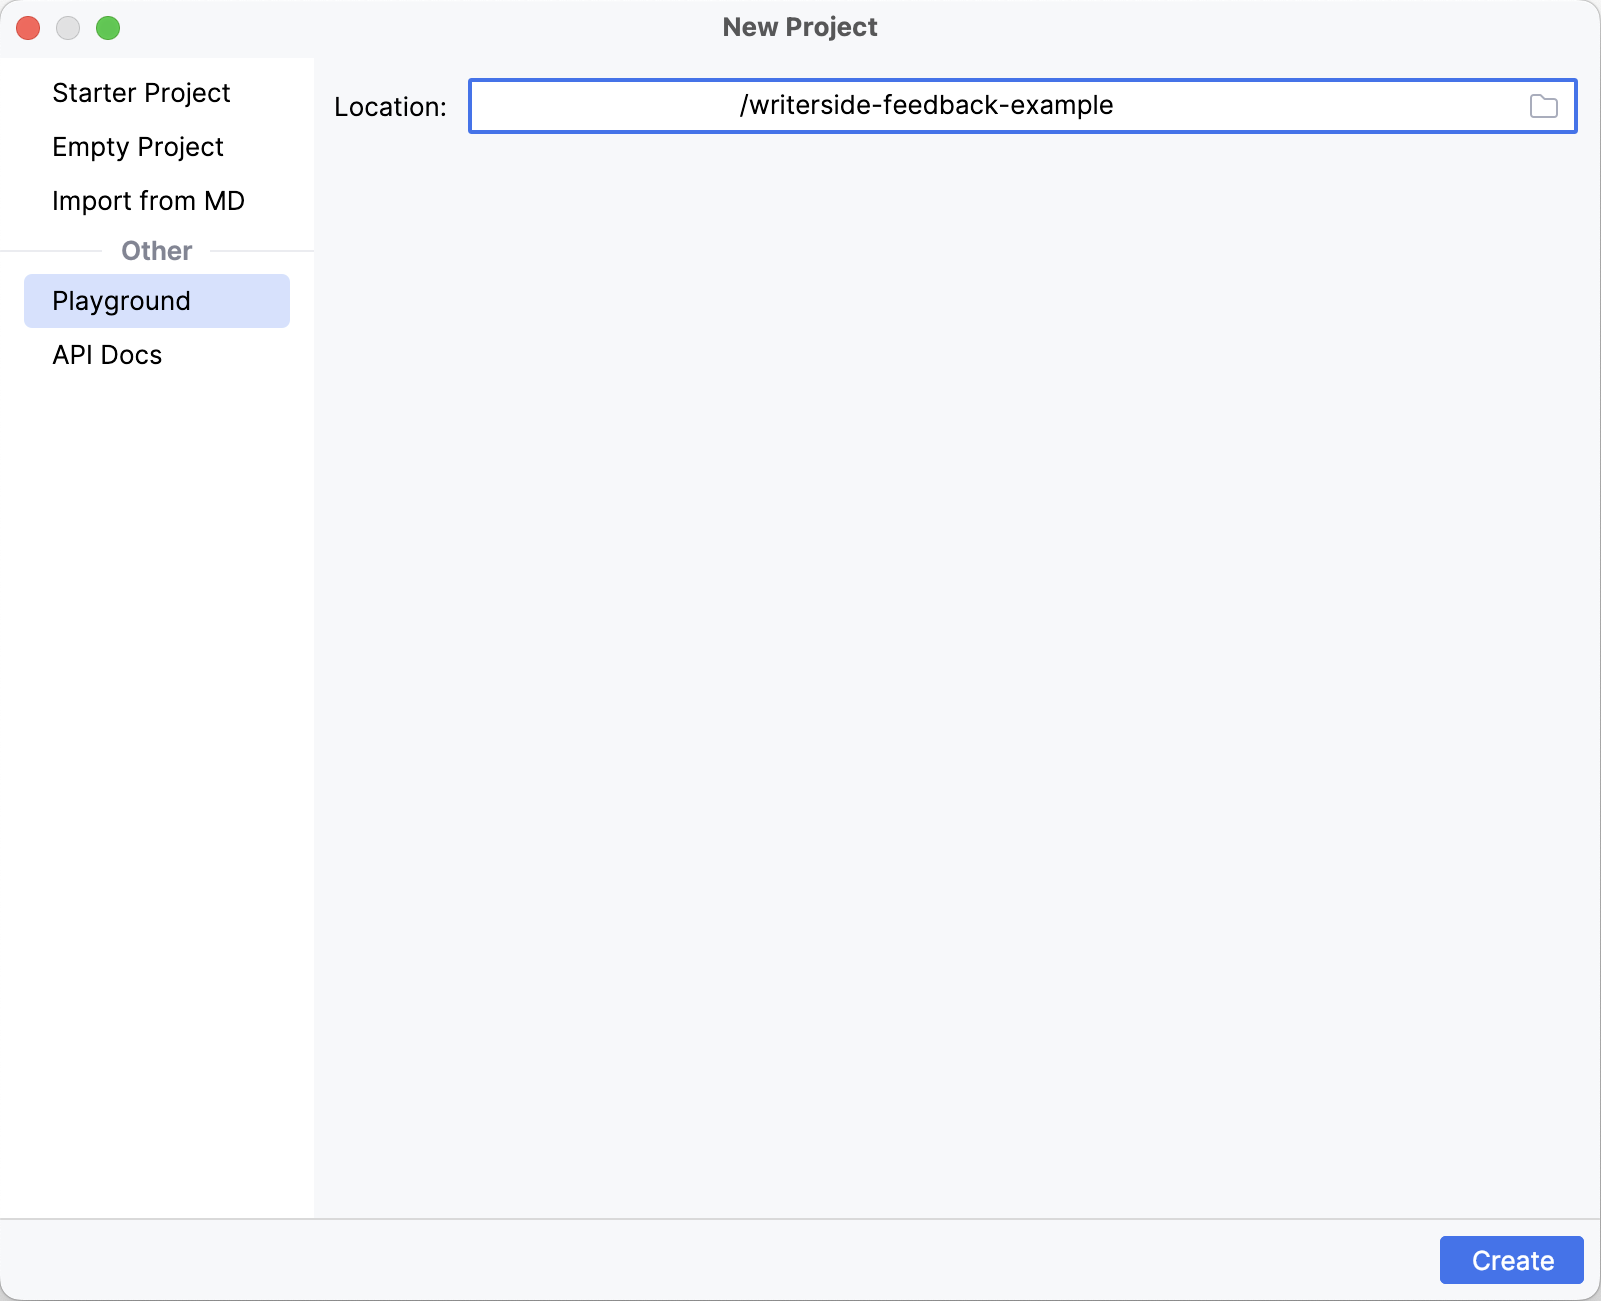
Create a new project in Writerside from the Playground option:
For easy deployment, I upload this project to GitHub and then use GitHub Actions to build and deploy the website to Cloudflare Pages.
-
Configure GitHub Action workflow:
The newly created project includes two instances: hi and si. The following workflow only deploys the hi instance to Cloudflare Pages.
name: Build documentation

on:
  push:
    branches: ["main"]
  workflow_dispatch:

env:
  INSTANCE: writerside-feedback/hi
  ARTIFACT: webHelpHI2-all.zip
  DOCKER_VERSION: 233.14272

jobs:
  build:
    runs-on: ubuntu-latest
    steps:
      - name: Checkout repository
        uses: actions/checkout@v4

      - name: Build Writerside docs using Docker
        uses: JetBrains/writerside-github-action@v4
        with:
          instance: ${{ env.INSTANCE }}
          artifact: ${{ env.ARTIFACT }}
          docker-version: ${{ env.DOCKER_VERSION }}

      - name: Upload documentation
        uses: actions/upload-artifact@v4
        with:
          name: docs
          path: |
            artifacts/${{ env.ARTIFACT }}
            artifacts/report.json
          retention-days: 7

  deploy:
    needs: build
    runs-on: ubuntu-latest
    permissions:
      contents: read
      deployments: write
    name: Deploy to Cloudflare Pages
    steps:
      - name: Download artifact
        uses: actions/download-artifact@v4
        with:
          name: docs
      - name: Unzip artifact
        run: |
          unzip -O UTF-8 ${{ env.ARTIFACT }} -d public
      - name: Install Node.js
        uses: actions/setup-node@v4
        with:
          node-version: '18'
      - name: Publish
        run: |
          cd public
          npx wrangler@3 pages deploy . --project-name writerside-feedback-example
        env:
          CLOUDFLARE_API_TOKEN: ${{ secrets.CLOUDFLARE_API_TOKEN }}
          CLOUDFLARE_ACCOUNT_ID: ${{ secrets.CLOUDFLARE_ACCOUNT_ID }}
This workflow first builds the Writerside project using JetBrains/writerside-github-action. It then deploys the documentation website to Cloudflare Pages using wrangler.
Note that you need to configure CLOUDFLARE_API_TOKEN and CLOUDFLARE_ACCOUNT_ID in your GitHub repository secrets. For more information, refer to Create secrets for a repository, Create an API token, and Find zone and account IDs.
- Trigger deployment:
After configuring CLOUDFLARE_API_TOKEN and CLOUDFLARE_ACCOUNT_ID, you can trigger the deploy.yml workflow. The website will become accessible within a few minutes. You can find the URL of your website on the Cloudflare Pages project page.
2. Enable the feedback widget in Writerside
Code example: https://github.com/Oreoxmt/writerside-feedback-example/commit/25d63e0dda916b655a8c1cf869b3ed6d9d6e82d9
Configuration
To enable the feedback widget, modify the cfg/buildprofiles.xml file as follows:
<?xml version="1.0" encoding="UTF-8"?>
<buildprofiles xsi:noNamespaceSchemaLocation="https://resources.jetbrains.com/writerside/1.0/build-profiles.xsd"
               xmlns:xsi="http://www.w3.org/2001/XMLSchema-instance">
    <variables>
        <feedback-widget>true</feedback-widget>
        <feedback-url>https://www.test.com</feedback-url>
    </variables>
</buildprofiles>
Then, you can trigger the deploy.yml workflow once more. After the deployment is completed, the feedback widget appears at the bottom of each page in your website.
Feedback widget behavior
Given that this feature is not officially documented, you can monitor the feedback widget's behavior in your browser's developer mode. For example, you can submit a feedback as follows:
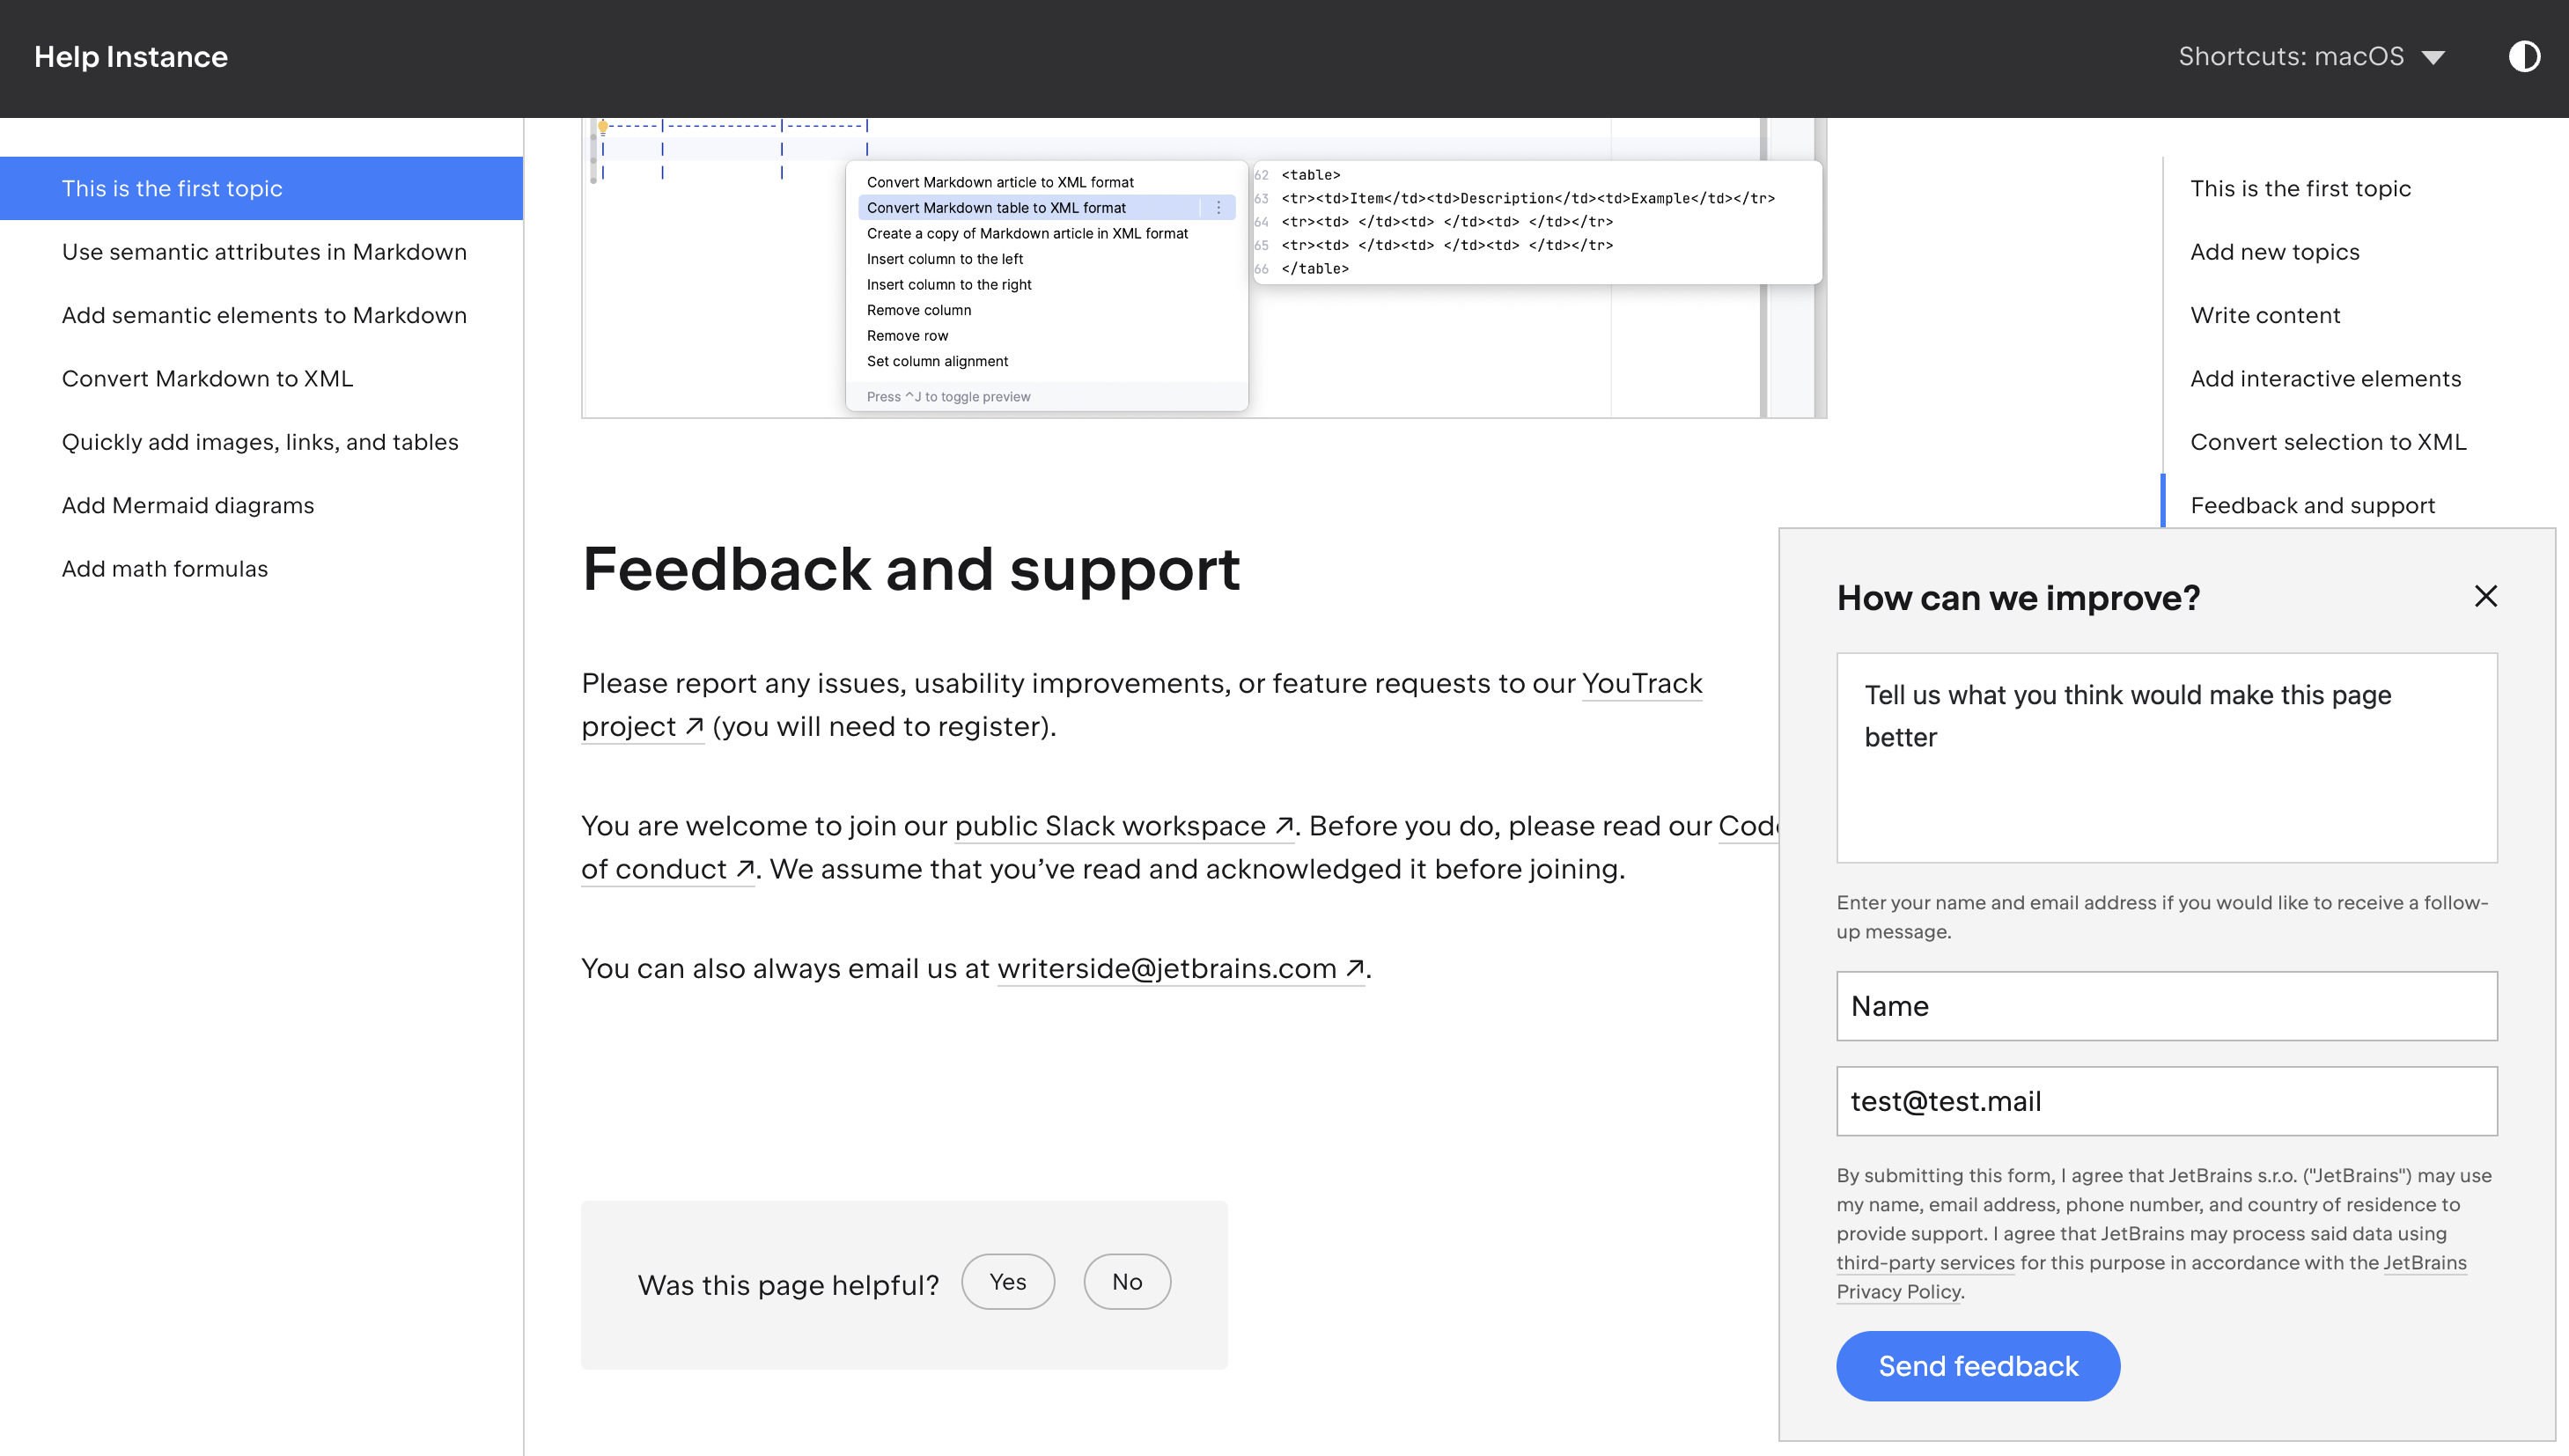
After clicking Send feedback, you will notice that a request is sent to the feedback URL https://www.test.com with the feedback information in the request payload.
{
  "articleId": "Default-topic",
  "content":"Tell us what you think would make this page better",
  "name":"Name",
  "email":"[email protected]",
  "title":"This is the first topic",
  "url":"https://writerside-feedback-example.pages.dev/default-topic.html#feedback-and-support"
}
Additionally, you might notice a prompt Feedback wasn't sent. Please try again later.. This occurs because the feedback URL https://www.test.com is not available.
In conclusion, the feedback module sends a POST request to the specified feedback URL, containing the feedback information in the request payload as follows:
{
  "articleId":"starter-topic",
  "content":"Feedback content",
  "name":"(Optional) Feedback user name",
  "email":"(Optional) Feedback user email",
  "title":"Page title",
  "url":"Page URL"
}
Therefore, it is necessary to have a server in place to receive this request and store the feedback information in a database. TiDB Cloud Data Service is an excellent option for this purpose.
3. Configure TiDB Cloud Data Service for feedback storage
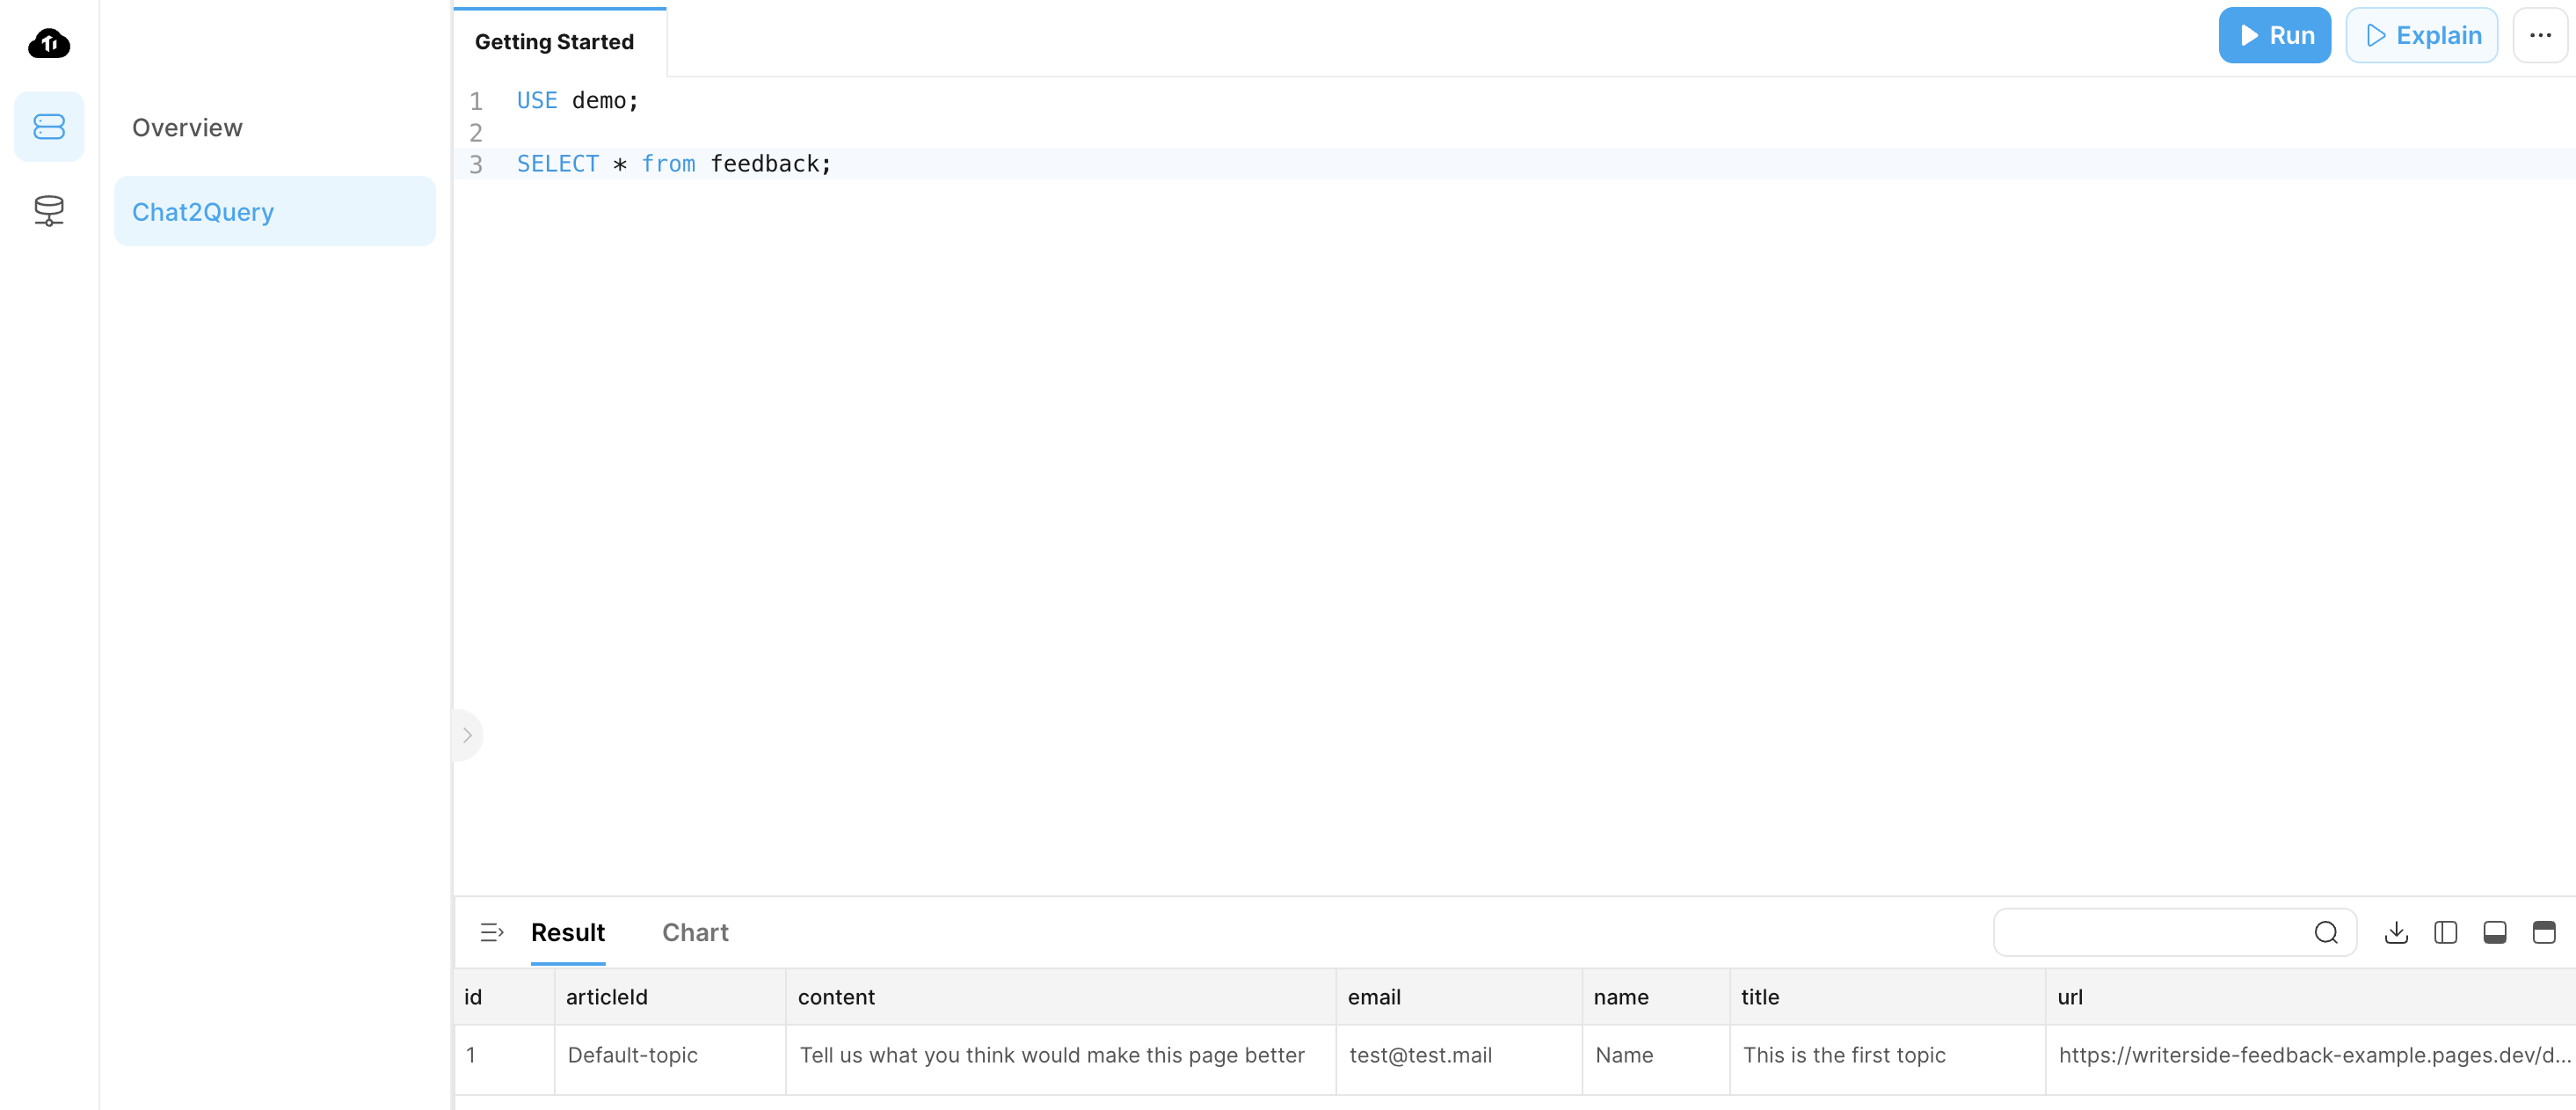
- Create a TiDB Serverless cluster and initialize the database as follows. For convenience, you can use Chat2Query in the TiDB Cloud console.
CREATE DATABASE demo;

USE demo;

CREATE TABLE
  feedback (
    id INT PRIMARY KEY AUTO_INCREMENT,
    articleId TEXT,
    content TEXT,
    email TEXT,
    name TEXT,
    title TEXT,
    url TEXT
  );

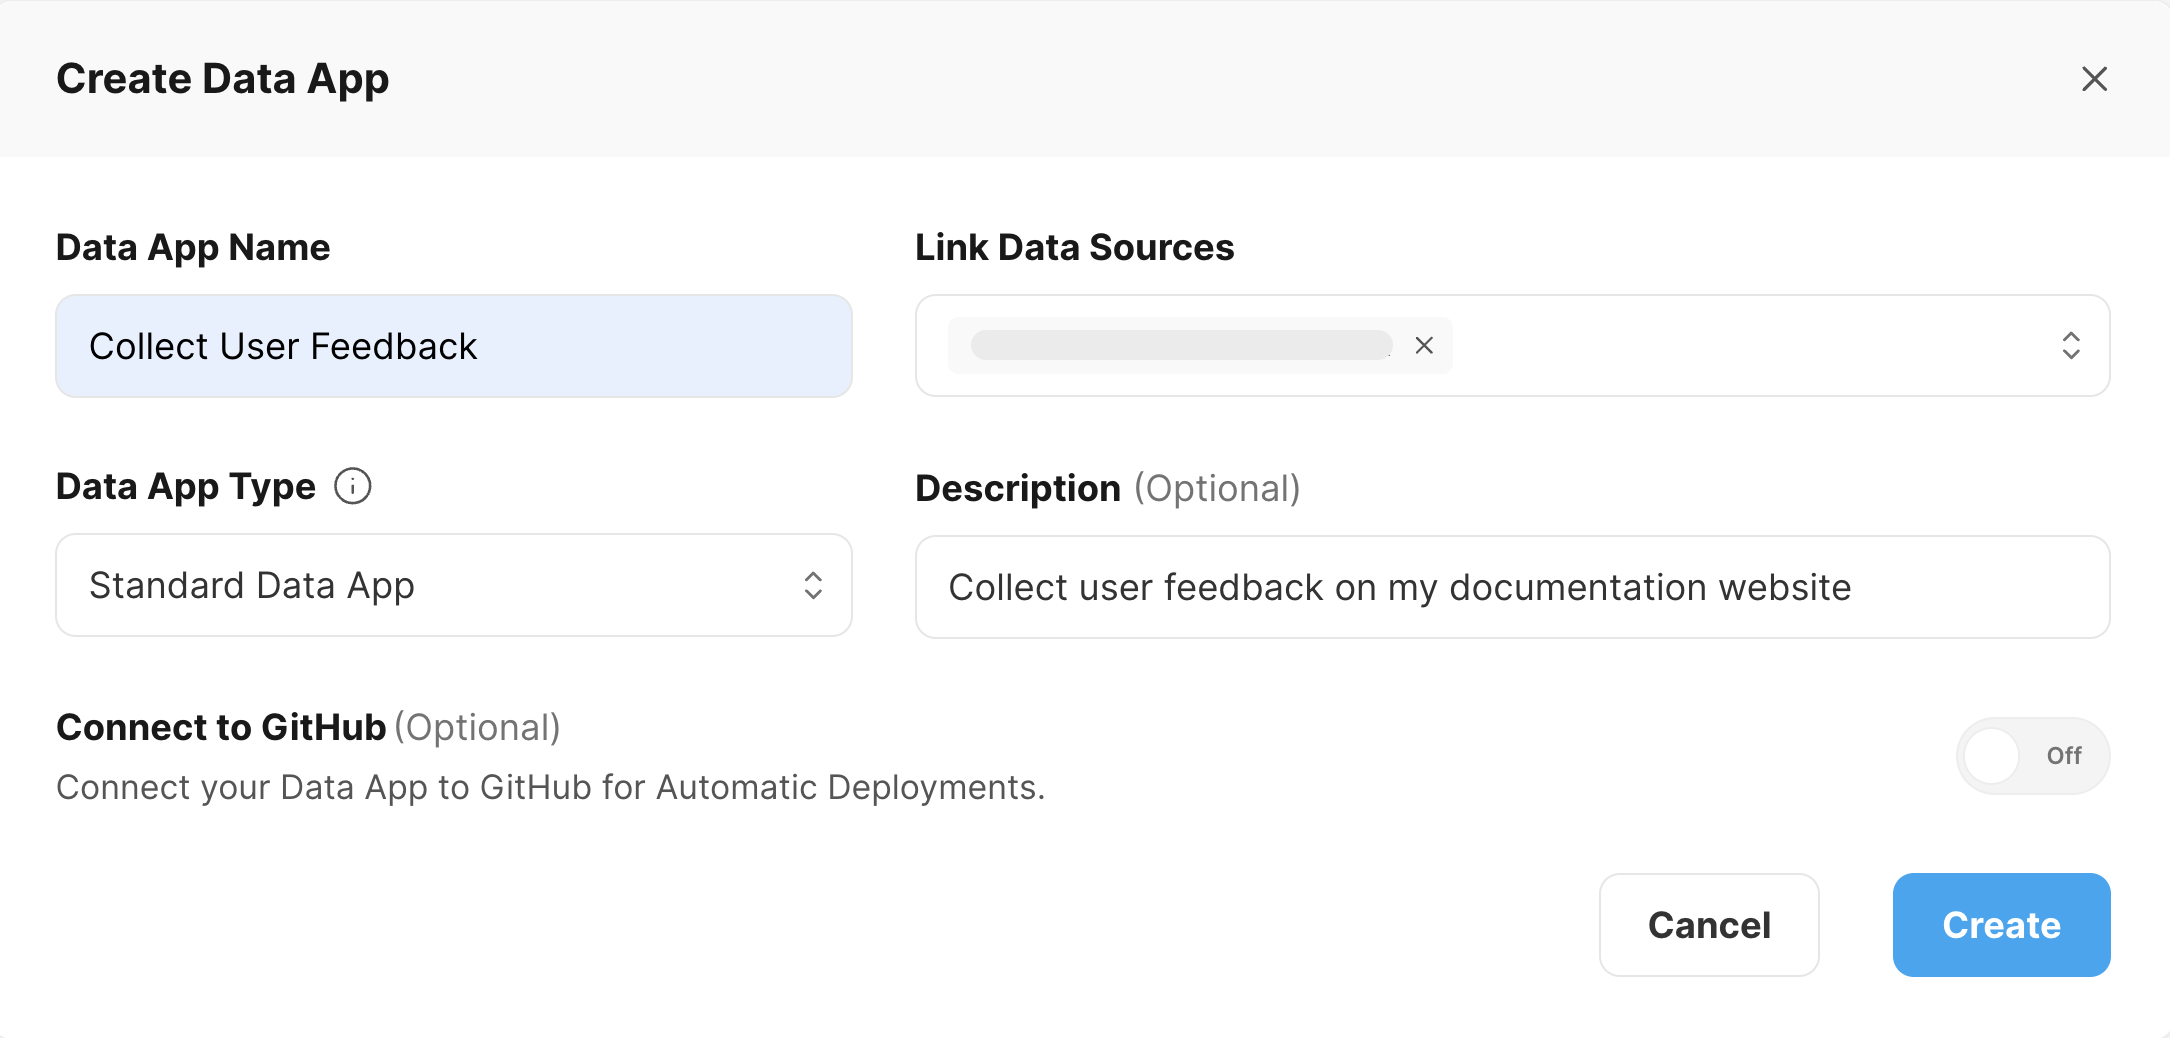
- Navigate to the Data Service page and create a new Data App.
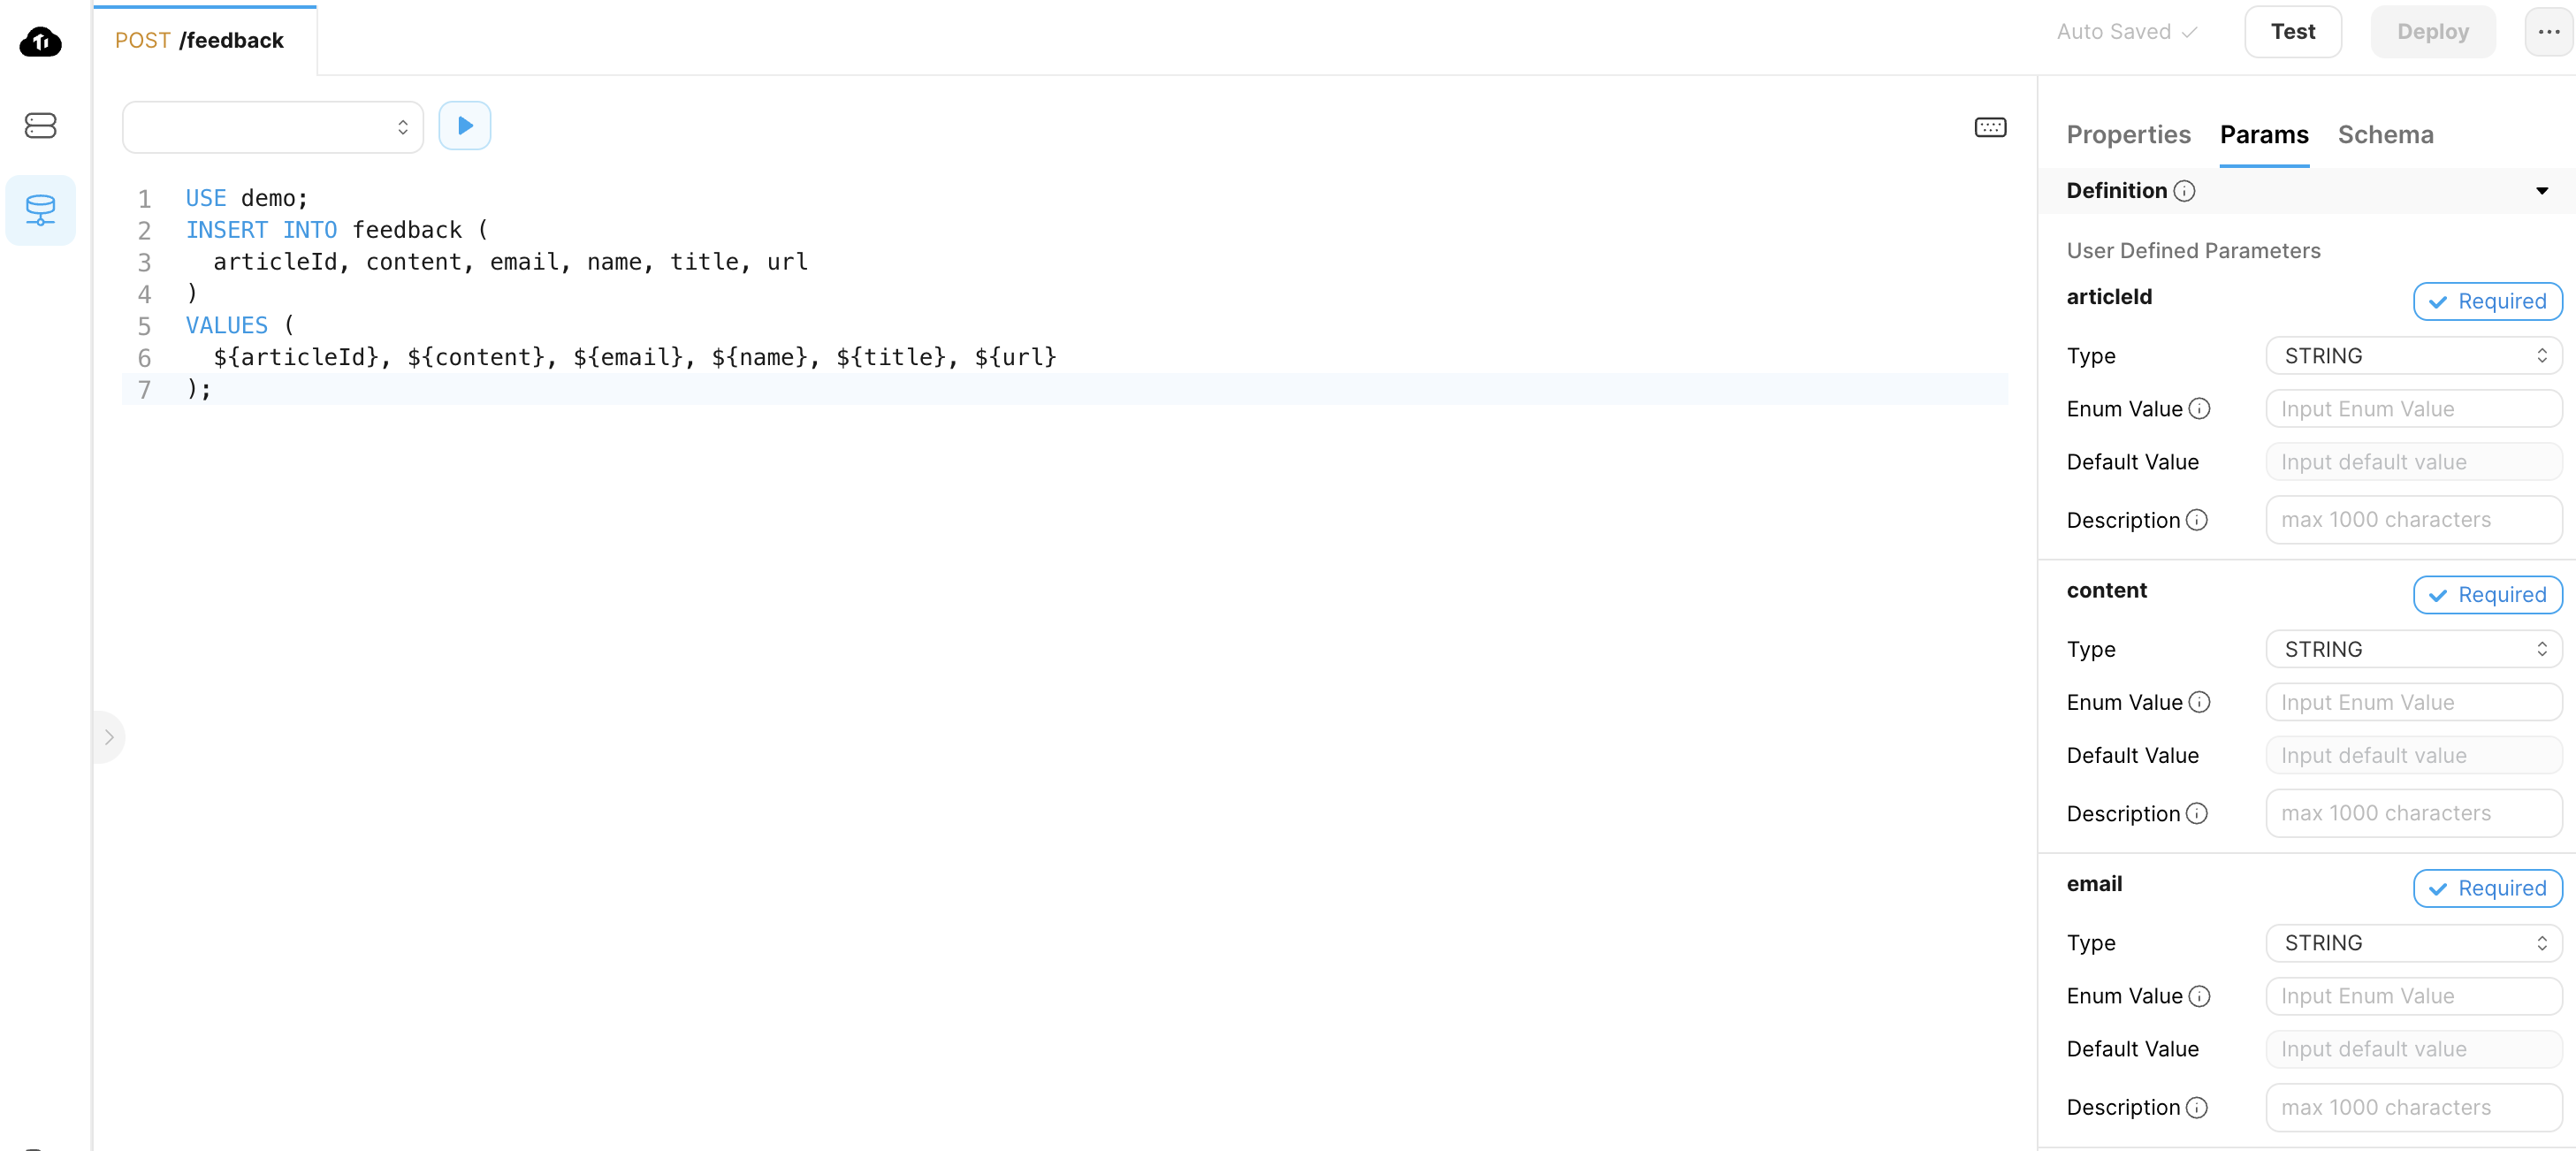
- Create an endpoint in the newly created Data App:
-
Set the Path, for example,
/feedback. -
Select POST as the Request Method.
-
Input the following SQL statements into the editor:
USE demo;
INSERT INTO feedback (
articleId, content, email, name, title, url
)
VALUES (
${articleId}, ${content}, ${email}, ${name}, ${title}, ${url}
); -
Configure the parameters as follows:
Parameter Type Description articleId String The article ID. content String The feedback content. email String The feedback user email. name String The feedback user name. title String The page title. url String The page URL.
-
Click Deploy in the upper-right corner to deploy the endpoint.
-
Copy the Endpoint URL from the Properties tab. Then, update this URL in the
cfg/buildprofiles.xmlfile:
<?xml version="1.0" encoding="UTF-8"?>
<buildprofiles xsi:noNamespaceSchemaLocation="https://resources.jetbrains.com/writerside/1.0/build-profiles.xsd"
               xmlns:xsi="http://www.w3.org/2001/XMLSchema-instance">
  <variables>
      <feedback-widget>true</feedback-widget>
      <feedback-url>https://{YOUR_DOMAIN}/feedback</feedback-url>
  </variables>
</buildprofiles>
- Trigger the
deploy.ymlworkflow again. After the deployment is completed, you can submit a feedback and observe its response using the developer mode of your browser.
You will notice that the feedback submission results in a 401 response. This happens because the endpoint lacks authentication. To make your API keys secure, consider using Cloudflare Pages Functions to send the request, as it enables you to keep the token secret.
4. Configure Cloudflare Pages Functions to forward the feedback request
Code example: https://github.com/Oreoxmt/writerside-feedback-example/commit/dd61bd4157c34f50308ef085e8d5b424dc79bb82
- Create the
functions/feedback.jsfile to forward the feedback request:
export async function onRequest(context) {
  const resp = await fetch(context.env.API_HOST, {
    method: 'POST',
    headers: {
      'Content-Type': 'application/json',
      'Authorization': context.env.API_AUTH
    },
    body: context.request.body
  });
  return new Response("Hi there!");
}
This function forwards the feedback request to TiDB Cloud Data Service, which is configured in the API_HOST and API_AUTH environment variables.
- Incorporate the Add function folder to output file step in the
deploy.ymlworkflow. After building the documentation, this step adds thefunctionsfolder to the output file, facilitating the deployment of the function to Cloudflare Pages.
name: Build documentation

jobs:
  build:
    runs-on: ubuntu-latest
    steps:
      - name: Checkout repository
        ...
      - name: Build Writerside docs using Docker
        ...
      - name: Add function folder to output file
        run: sudo zip -r "artifacts/${{ env.ARTIFACT }}" functions/
      - name: Upload documentation
        ...
  deploy:
    ...
-
Navigate to your TiDB Cloud Data App and create an API key with ReadAndWrite role.
-
Convert the public key and private key into a base64 encoded string. For example, if your public key is
public_keyand your private key isprivate_key, you can encode them as follows:echo -n "public_key:private_key" | base64
# cHVibGljX2tleTpwcml2YXRlX2tleQ== -
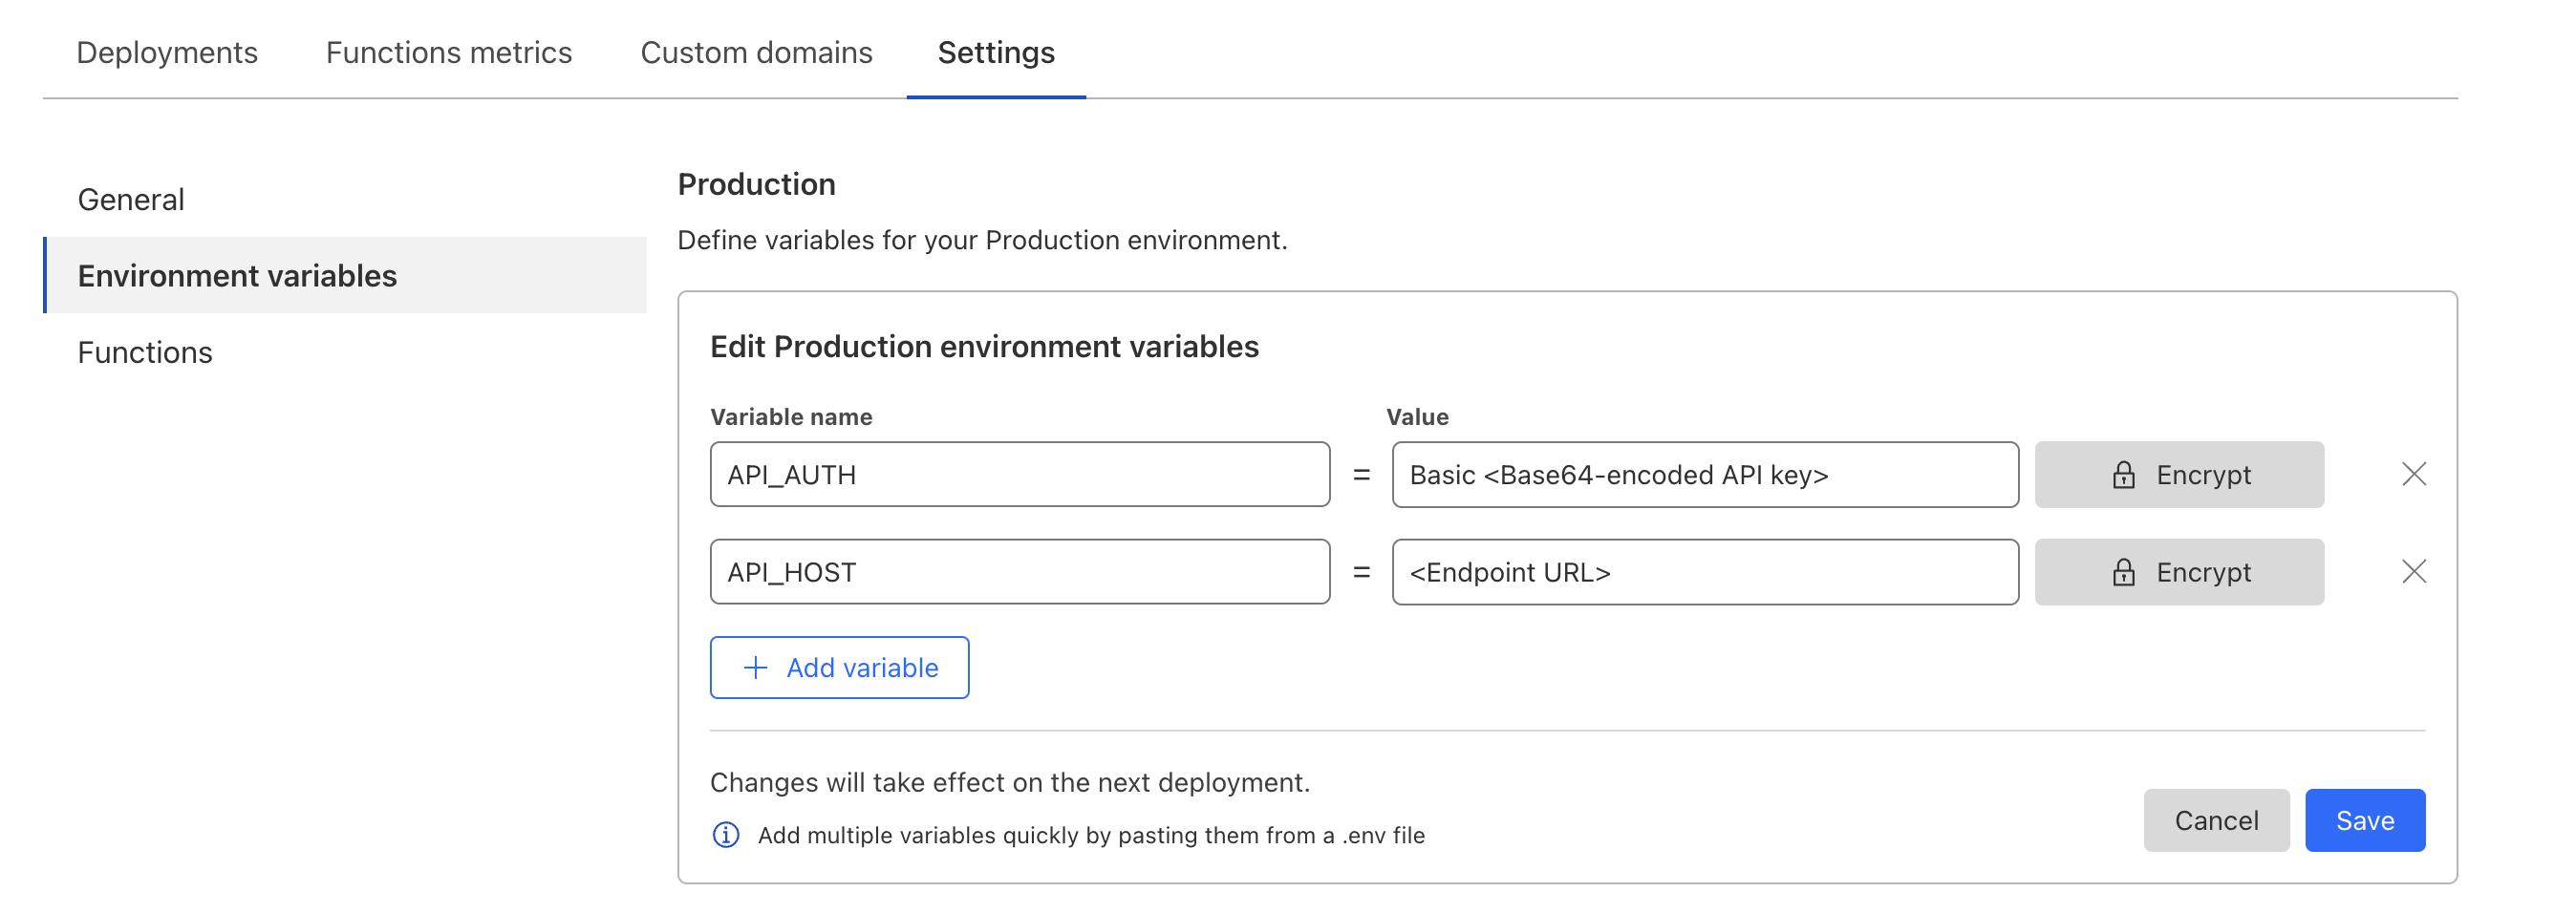
In your Cloudflare Pages project (
writerside-feedback-examplein this example), configure the following environment variables:API_HOST: The endpoint URL.API_AUTH: The base64 encoded API key. For example,Basic cHVibGljX2tleTpwcml2YXRlX2tleQ==.
-
Trigger the
deploy.ymlworkflow once more. After the deployment is completed, you can submit a feedback and verify that it is successfully stored in the database.
Conclusion
When you submit a feedback on this page, the following process occurs:
- The feedback widget sends a
POSTrequest to the feedback URL (Cloudflare Pages Functions) with the feedback information in the request payload. - The function receives the request and forwards it to the endpoint URL (TiDB Cloud Data Service) with the API token.
- TiDB Cloud Data Service receives the request and stores the feedback information in the database.