如何用 Python 测试 Shell 脚本,顺便写一个测试框架

本文以 pingcap-docsite-preview 项目中的测试框架为例,介绍如何使用 Python 测试 Shell 脚本。
pingcap-docsite-preview 是一个用于预览文档内容的项目。它使用一些 Shell 脚本更新文档网站的内容。为了确保 Shell 脚本的代码质量和功能正确性,该项目使用 Python 构建了一个测试 Shell 脚本的框架。
下面以测试 sync_scaffold.sh 为例,该脚本用于更新 markdown-pages 目录以及 docs.json 文件内容。
问题拆解
在设计测试框架之前,首先按照如下思路拆解问题。
- 测试是什么?
测试是为了验证程序是否符合需求,常见的验证方法是判断程序的实际运行结果是否与预期结果一致。所以,核心在于比较。
- 如何比较?
比较的具体技术实现取决于要比较的内容格式。如果程序返回的是 status code,可直接判断是否相等。在 sync_scaffold.sh 脚本中,返回的是文件。此时可以比较文件夹结构或文件内容。项目中使用 diff 命令比较文件内容。
-
如何获取要比较的内容?
- 预期的输出结果:人工编写
- 实际的输出结果:程序运行后产生
-
在哪里运行程序?
在开发过程中,我们可以在本地运行 Shell 脚本。但是,在测试中,为了保证测试的可重复性,我们需要准备一个测试环境用于运行 Shell 脚本。该测试环境需要包含 Shell 脚本和输入数据。
在测试 sync_scaffold.sh 脚本时,需要准备以下内容:
sync_scaffold.sh脚本并且有执行权限sync_scaffold.sh的输入,即markdown-pages目录和docs.json文件
由于 sync_scaffold.sh 中的 rsync 命令可以自动创建 markdown-pages 目录,同时 cp 命令可以自动创建 docs.json 文件,所以在测试中可以使用空的输入数据。
-
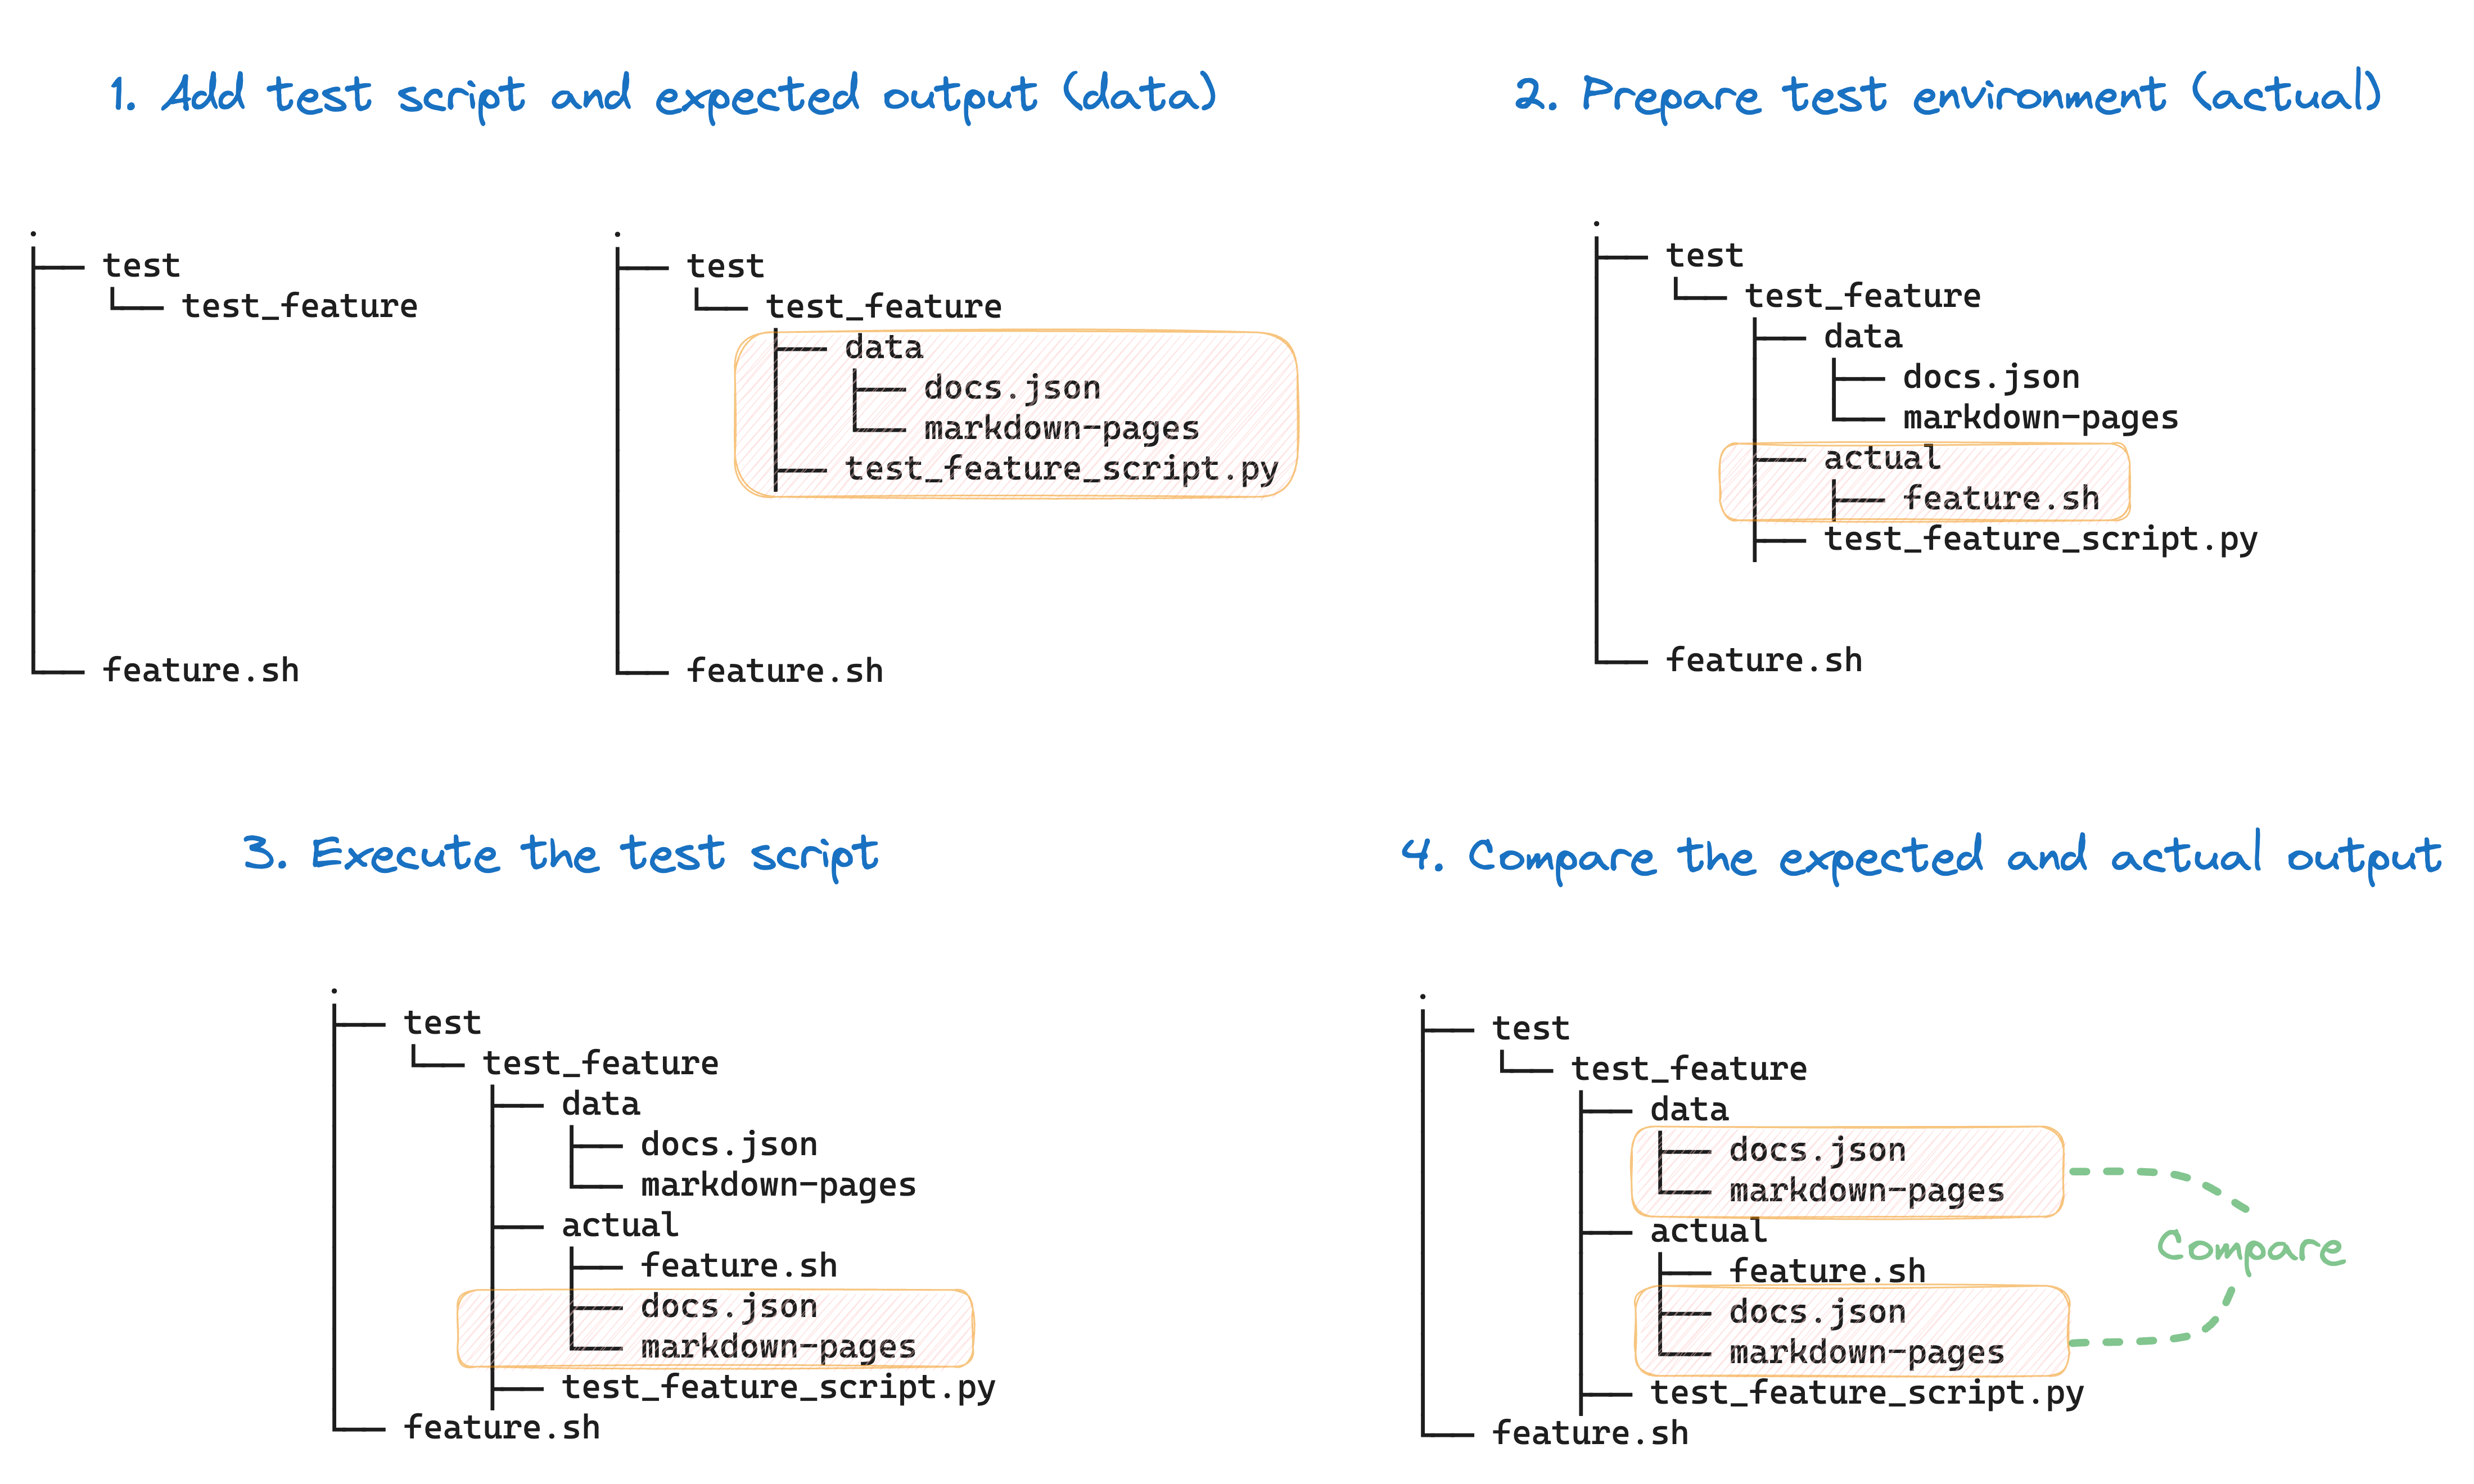
整体测试的工作流是什么?
- 准备测试环境:
- 确保测试环境有且仅有测试所需的内容:
cp -r sync_scaffold.sh data/ - 确保测试环境中的脚本有执行权限:
chmod +x sync_scaffold.sh
- 确保测试环境有且仅有测试所需的内容:
- 执行程序:
./sync_scaffold.sh - 比较程序运行的实际结果 (
data/) 和预期结果 (actual/):diff -r data actual
- 准备测试环境:
-
如何在 Python 中实现测试?
- 使用
shutil.rmtree()清理测试环境
import shutil
import os

if os.path.exists(test_output):
  shutil.rmtree(test_output)
os.makedirs(test_output, exist_ok=True)- 使用
shutil.copy()复制测试脚本
import shutil
shutil.copy(script, test_feature_path)- 使用
os.chmod()确保脚本有执行权限
import os
os.chmod(script, 0o755)- 使用
subprocess执行 Shell 脚本
import subprocess
process = subprocess.Popen(test_feature_path)
code = process.wait() - 使用
测试框架的代码实现
定义成员
DocSitePreviewTest 类的成员变量如下:
test_dir:测试环境所在的目录feature_dir:待测试脚本所在的目录script_name:待测试脚本的名称test_output:测试环境的输出目录 (test_dir/actual),用于存放实际输出test_feature_path:测试环境中待测试脚本的路径 (test_output/script_name)
class DocSitePreviewTest:

  def __init__(self, test_dir: str, feature_dir: str, script_name: str):
    self.feature_dir = feature_dir
    self.script_name = script_name
    self.test_dir = test_dir
    self.test_output = os.path.join(self.test_dir, "actual")
    self.test_feature_path = os.path.join(self.test_output, self.script_name)
    self._setup_test_env()
准备测试环境
在初始化 DocSitePreviewTest 类时,会调用 _setup_test_env() 方法,该方法会执行以下操作:
DocSitePreviewTest._clean_up()清理测试环境,即确保test_output目录的内容为空DocSitePreviewTest._copy_and_setup_script()复制待测试脚本到测试环境中DocSitePreviewTest._make_script_executable()确保待测试脚本有执行权限
class DocSitePreviewTest:

  def _setup_test_env(self):
    """
    Generate the test environment for execution.
    1. Clean up the test environment.
    2. Copy the target script to the test environment.
    """
    self._clean_up()
    self._copy_and_setup_script()

  def _clean_up(self):
    """
    Clean up the test environment.
    """
    if os.path.exists(self.test_output):
        shutil.rmtree(self.test_output)
    os.makedirs(self.test_output, exist_ok=True)

  def _copy_and_setup_script(self):
    """
    Copy the script to the test environment.
    """
    shutil.copy(os.path.join(self.feature_dir, self.script_name), self.test_feature_path)
    self._make_script_executable(self.test_feature_path)

  @staticmethod
  def _make_script_executable(script: str):
    """
    Make the script executable (chmod +x).
    """
    os.chmod(script, 0o755)
执行待测试脚本
DocSitePreviewTest.execute() 方法用于执行待测试脚本,其中:
args:待测试脚本的参数env:待测试脚本的环境变量
class DocSitePreviewTest:

  def execute(self, args: str = "", env: dict | None = None):
    """
    Execute the feature command.
    """
    command_str = self.test_feature_path + " " + args
    command_list = shlex.split(command_str)
    self._execute_command(command_list, self.test_output, env)

  @staticmethod
  def _execute_command(command, cwd, env=None):
    """
    Execute a command and check its exit code.
    Raise an exception if the command does not return 0.
    """
    process = subprocess.Popen(command, cwd=cwd, env=env)
    code = process.wait()
    if code != 0:
        raise Exception("Error: command returned code {}".format(code))
使用示例:
from test_util import DocSitePreviewTest

script_name: str = "sync_scaffold.sh"
script_args: str = "main"

script_env = os.environ.copy()
script_env["TEST"] = str(1)

test = DocSitePreviewTest(test_dir, feature_dir, script_name)
test.execute(args=script_args, env=script_env)
验证输出
DocSitePreviewTest.verify() 方法用于验证待测试脚本的输出,其中 command 为 diff 命令,例如 diff -r data actual。
class DocSitePreviewTest:

  @staticmethod
  def _execute_command(command, cwd, env=None):
    """
    Execute a command and check its exit code.
    Raise an exception if the command does not return 0.
    """
    process = subprocess.Popen(command, cwd=cwd, env=env)
    code = process.wait()
    if code != 0:
        raise Exception("Error: command returned code {}".format(code))

  def verify(self, command: str = "diff -r data actual"):
    """
    Use diff command to compare the expected output (data) and the actual output.
    """
    args = shlex.split(command)
    self._execute_command(args, self.test_dir)
    print("Test {} passed successfully".format(self.script_name))
使用示例:
from test_util import DocSitePreviewTest

diff_command_line: str = f"diff -r data actual --exclude temp --exclude {script_name}"

test = DocSitePreviewTest(test_dir, feature_dir, script_name)
test.verify(diff_command_line)
测试框架的使用
目录结构
这个项目的目录结构如下,其中功能脚本 sync_scaffold.sh 位于根目录下,test 为测试目录:
.
├── sync_scaffold.sh
└── test
    ├── sync_scaffold
    │   ├── actual
    │   ├── data
    │   └── test_sync_scaffold.py
    └── test_util.py
测试新功能
在这个项目中,基于 DocSitePreviewTest 对新功能进行测试只需要准备以下内容:
-
创建功能测试目录,例如
test/sync_scaffold -
准备测试功能的预期输出数据
test/sync_scaffold/data -
编写测试功能的 Python 脚本,例如
test/sync_scaffold/test_sync_scaffold.py- 提供待测试脚本的名称
script_name - 提供待测试脚本的参数
script_args - 提供待测试脚本的环境变量
script_env - 提供验证功能的
diff命令diff_command_line
- 提供待测试脚本的名称
配置步骤如下图所示:
示例
下面是测试 test_sync_scaffold.sh 功能对应的 Python 脚本:
import sys
import os

test_dir: str = os.path.dirname(os.path.abspath(__file__))
feature_dir: str = os.path.dirname(os.path.dirname(test_dir))
sys.path.append(os.path.dirname(test_dir))

from test_util import DocSitePreviewTest

script_name: str = "sync_scaffold.sh"
script_args: str = "main"
diff_command_line: str = f"diff -r data actual --exclude temp --exclude {script_name}"

script_env = os.environ.copy()
script_env["TEST"] = str(1)

test = DocSitePreviewTest(test_dir, feature_dir, script_name)

test.execute(args=script_args, env=script_env)

test.verify(diff_command_line)
为什么上面的代码示例中需要先 sys.path.append(os.path.dirname(test_dir)) 再 from test_util import DocSitePreviewTest?
如果在 test/sync_scaffold/test_sync_scaffold.py 开头直接 from test_util import DocSitePreviewTest 会发生什么?
python3 test/sync_scaffold/test_sync_scaffold.py
Traceback (most recent call last):
  File "test/sync_scaffold/test_sync_scaffold.py", line 3, in <module>
    from test_util import DocSitePreviewTest
ModuleNotFoundError: No module named 'test_util'
会报错 ModuleNotFoundError: No module named 'test_util'。
这是因为 Python 解释器处理 import 语句时会在 sys.path 列表中的目录里查找这个模块。在执行 test_sync_scaffold.py 时,初始化的 sys.path 列表中会包含 test/sync_scaffold 目录,而 test_util.py 不在 test/sync_scaffold 目录中,所以会报错。
更多信息请参考 The initialization of the sys.path module search path。
为了解决这个问题,需要将 test_util.py 所在的目录 test 添加到 sys.path 中。
import sys
import os

print(sys.path)
test_dir: str = os.path.dirname(os.path.abspath(__file__))
feature_dir: str = os.path.dirname(os.path.dirname(test_dir))
sys.path.append(os.path.dirname(test_dir))
print(sys.path)
执行结果如下:
['/Projects/test/sync_scaffold', '/opt/homebrew/Cellar/[email protected]/...']
['/Projects/test/sync_scaffold', '/opt/homebrew/Cellar/[email protected]/...', '/Projects/test']